Scanning Laser Vibrometer (SLV)
Optical interference is observed when two coherent beams of light coincide. The resulting intensity varies with the phase difference between the two beams. This phase difference is a function of the different path lengths of the two beams. If one of the two beams is reflected back from a moving object, then the path difference becomes a function of time. The interference fringe pattern moves, and the displacement of an object can be calculated by directionally counting the passing fringe pattern.

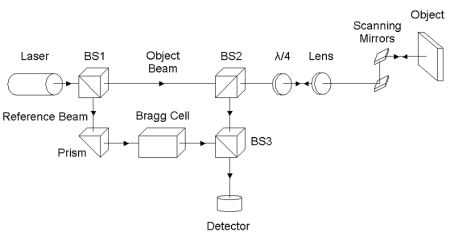
In the Polytec PSV300 Scanning Laser Vibrometer used in this work the velocity and displacement measurements are carried out using a modified Mach-Zehnder interferometer. The optical configuration of the scanning head is shown in opposite. A helium-neon laser provides a linearly polarised beam of light. A polarising beam splitter (BS1) splits the beam into object and reference beams. The object beam passes through a second polarising beam splitter (BS2) and a quarter wave plate before being focussed by a lens and directed to a specific point on the object by the scanning mirrors. The beam is then reflected back from the object, via the scan mirrors and lens again passing through the quarter wave plate. As the beam has twice passed through the quarter wave plate the polarising beam splitter (BS2) directs the beam to the third beam splitter (BS3). The Bragg cell adds a frequency offset to the reference beam in order to determine the sign of the velocity signal. The resultant interference signal of the object and reference beams is converted into an electronic signal by the optical detector to be decoded by the instrument’s control system.
This microscope detects objects by very gently touching their surface instead of using the light they reflect or transmit. The AFM uses a thin cantilever with a very small 'needle' with an incredibly sharp tip that is dragged, or tapped, across the surface of an object. A laser beam is used to detect the deflections of the cantilever, so letting us make a map of the topography of the object’s surface. It is so sensitive that it allows us to ‘see' individual atoms on the surface of a material. The instrument can also be used to measure the force between the sample and tip at a single point of contact. The tip can be pressed in and out of a sample. During this motion, the cantilever deflection is measured, and allows us to calculate mechanical properties of the sample, such as its stiffness.
The instrument here in the Bionanoscience group is mounted on an inverted optical microscope. This provides us with high quality optical images of our sample and cantilever. In addition to allowing us precise positioning of our cantilever tip on our samples, we can also carry out high-speed fluorescence imaging.
Bionanoscience
School of Biological Sciences
Woodland Road
University of Bristol
Bristol
BS8 1UG
email:D.Robert@bristol.ac.uk